Hi Every one,
I have prepared a small example of how to connect the Odata Entities to LogicApps.
I have prepared a small example of how to connect the Odata Entities to LogicApps.
- First of all, register your D365FO VM in Azure portal and save the "Client Id, Tenant Id and Secret key", as we gonna need these details in LogicApp.
- Now goto Azure portal and create a resource group.
- To create a new resource group in Azure, check this link: https://docs.microsoft.com/en-us/azure/azure-resource-manager/management/manage-resource-groups-portal
- After the resource group is created search for LogicApps in Azure and click on Add button to create a new LogicApp.
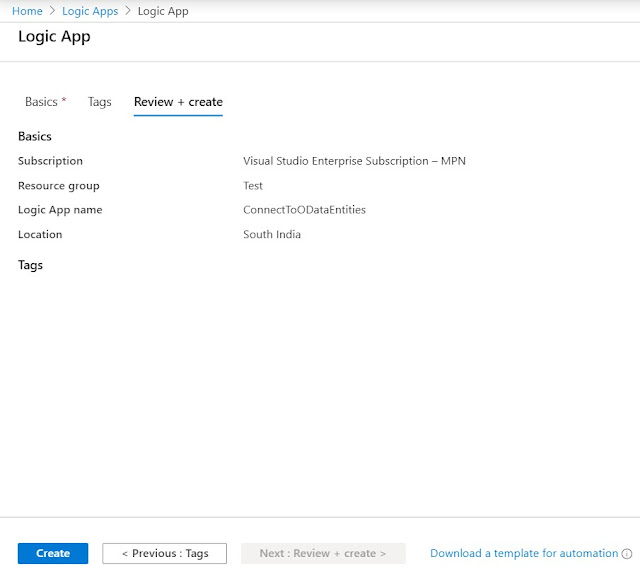
- Complete the details in new Logic App, provide the Resource group name which you have created and provide the LogicApp name and select the location.
- Now click on create button and it will deploy the App
- As you can see, I have added a Recurrence to run our app with certain interval of time and also I have added few variables where I have declared some of the values, so that I can reuse the values and don't have to copy paste every time.
- In the above image
- varD365baseURL: Provide your D365FO environment url.
- varClientId: Provide the Client Id that was generated while registering your VM in Azure Portal.
- varTenantId: Provide the Tenant Id that was generated while registering your VM in Azure Portal.
- varSecretKey: Provide the Secret Id that was generated while registering your VM in Azure Portal.
- Now after the variable declarations, add the HTTP action
- In the above image:
- URL format: https://login.microsoftonline.com/"TenantId"/oauth2/token
- Body format:clientid="Client Id"&grant_type=client_credentials&client_secret="SecretKey"&resource="D365FO VM URL"
- Note: Don't give any space in the body parameters
- Once this is completed we have to parse the JSON which will be generated by this step.
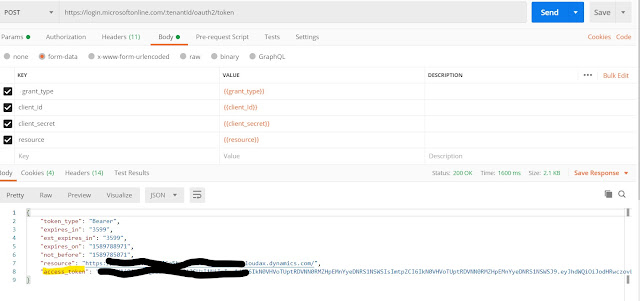
- To do it, I have used PostMan App and fed up the above details as it is to generate the JSON format.
- As you can see in the above image I have declared some global variables in PostMan for re-usability.
- After creating the global variables for "Tenant Id, Client Id, Grant_Type, and resource" which are the values we provide in the "HTTP Action" in Logic App, select the Post function in PostMan as shown below and goto Params tab and give the Tenant Id as shown below:
- Now click on Send button to generate the Bearer Token, which is required for next step:
- Copy the access token value and save it also as global variable with name "Bearer_token".
- Now copy the response from the Post action of the Postman and goto Logic App and add a new step with action Parse JSON:
- Copy the response from Postman as shown below.
- Goto Logic app and add ParseJson Action, click on "Use sample payload to generate schema" and paste the copied Response from Postman.
- Once the schema is added, add a new HTTP Action and add the OData entity URL for CustomerV3 entity to read the customer:
- Here in the above picture, I have applied filter to read a particular customer only.
- Odata entity URL: "Youy D365FO environment URL"/data/CustomersV3 (Odata entity public name)/?$filter=CustomerAccount eq'US-019'
- In plain english, without encoding: https://D365 URL/data/CustomersV3?$filter=CustomerAccount eq 'US-019'
- Now we have to again parse the JSON for HTTP2 Action in postman, so create a new GET request in postman and enter the ODATA Entity URL for Customer Entity, now goto Headers tab and add a new key with name Authorization and in value, provide the Bearer Token value for which we have created the Global variable in previous step, now click on send button and copy the response and goto Logic App.
- Now add the new action "Parse JSON" again for HTTP2 action, and paste the Response which we have generated in previous step in Postman
- Logic App is completed, run it to see the results.
That's all for now...


No comments:
Post a Comment