Wednesday, 19 August 2020

How to debug Azure Function Apps locally with Postman

 Hello All,


Let's see how to debug the azure function app locally with the help of postman.

I have created a new function app which reads value from my Azure BYOD sql database table.

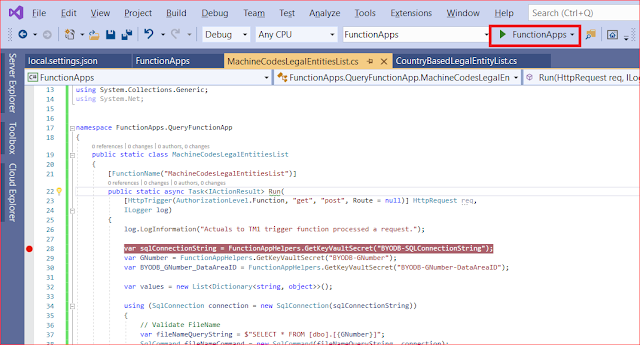
Now Click on the FunctionApps button on the top as in below screen shot:


After clicking on the FunctionApps button, it will give a command window with all the functionApp names with their HTTP request link which we have to copy as shown in the below screen shot, copy the link which is marked in red.


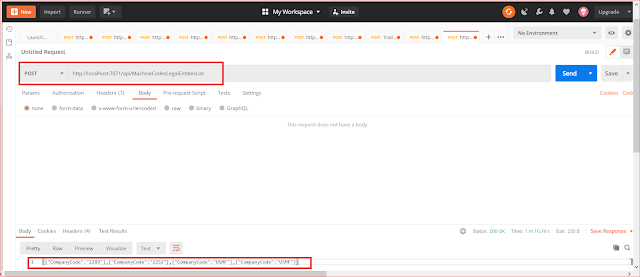
Now open the postman and paste the link which we have copied and create a new post request, and check the result.

If your FunctionApp requires a body then provide it.


Like this we can do the test for our FunctionApp locally with Postman.


Saturday, 11 July 2020

Create and post pending vendor invoices without purchase order in D365 FO using x++

If you don't have purchase order details but still needs to create and post pending vendor invoice then the below code may help.


class RunnableClass1
{
    
    /// <summary>
    /// Runs the class with the specified arguments.
    /// </summary>
    /// <param name = "_args">The specified arguments.</param>
    public static void main(Args _args)
    {
        VendInvoiceInfoTable            vendInvoiceInfoTable;
        VendInvoiceInfoSubTable     vendInvoiceInfoSubTable;
        VendInvoiceInfoLine             vendInvoiceInfoLine;
        VendInvoiceInfoSubLine      vendInvoiceInfoSubLine;
        PurchParmUpdate                 purchParmUpdate;

        PurchFormletterParmData     purchFormletterParmData = PurchFormletterParmData::newData(DocumentStatus::Invoice, VersioningUpdateType::Initial);
        PurchFormLetter         purchFormLetter;
        
        purchFormletterParmData.init();
        purchFormletterParmData.parmOnlyCreateParmUpdate(true);
        purchFormletterParmData.createData(false);
        purchParmUpdate = purchFormletterParmData.parmParmUpdate();

        ttsbegin;
        vendInvoiceInfoTable.clear();
        vendInvoiceInfoTable.initValue();

        vendInvoiceInfoTable.DocumentOrigin  = DocumentOrigin::Manual;
        vendInvoiceInfoTable.DeliveryName = '';
        //vendInvoiceInfoTable.Num = "INV015"; //add invoice number in here
        vendInvoiceInfoTable.InvoiceAccount = '1001';
       
        vendInvoiceInfoTable.defaultRow(null, null, true);
        vendInvoiceInfoTable.Num = "INV031";
        vendInvoiceInfoTable.VendInvoiceSaveStatus = VendInvoiceSaveStatus::Pending;
        vendInvoiceInfoTable.DocumentDate = systemDateGet();
        vendInvoiceInfoTable.LastMatchVariance = LastMatchVarianceOptions::OK;
        vendInvoiceInfoTable.CashDiscDate  = systemDateGet() + 10; 

        vendInvoiceInfoTable.insert();
        
        if(vendInvoiceInfoTable)
        {
            vendInvoiceInfoSubTable.clear();
            vendInvoiceInfoSubTable.initValue();
            vendInvoiceInfoSubTable.defaultRow();
 
            vendInvoiceInfoSubTable.ParmId = vendInvoiceInfoTable.ParmId;
            vendInvoiceInfoSubTable.OrigPurchId = vendInvoiceInfoTable.PurchId;
            vendInvoiceInfoSubTable.PurchName = vendInvoiceInfoTable.PurchName;
            vendInvoiceInfoSubTable.TableRefId = vendInvoiceInfoTable.TableRefId;
 
            vendInvoiceInfoSubTable.insert();
        }

        vendInvoiceInfoLine.clear();
        vendInvoiceInfoLine.initValue();
 
        vendInvoiceInfoLine.DeliveryName = vendInvoiceInfoTable.DeliveryName;
        vendInvoiceInfoLine.TableRefId = vendInvoiceInfoTable.TableRefId;
        vendInvoiceInfoLine.currencyCode = vendInvoiceInfoTable.CurrencyCode;
        vendInvoiceInfoLine.LineNum = 1;
        
        InventTable inventTable = InventTable::find("C0001");


        vendInvoiceInfoLine.InvoiceAccount = vendInvoiceInfoTable.InvoiceAccount;
        vendInvoiceInfoLine.OrderAccount  = vendInvoiceInfoTable.OrderAccount;
        vendInvoiceInfoLine.ItemId = inventTable.ItemId;
        vendInvoiceInfoLine.modifiedField(fieldNum(VendInvoiceInfoLine, ItemId));
 
        vendInvoiceInfoLine.DocumentOrigin = DocumentOrigin::Manual;
 
        vendInvoiceInfoLine.ReceiveNow = 1.2;
        vendInvoiceInfoLine.RemainBefore = 1.2;
        vendInvoiceInfoLine.RemainBeforeInvent = 1.2;
 
        vendInvoiceInfoLine.PurchPrice = 5.5;
        vendInvoiceInfoLine.InventNow = 1.2;
        vendInvoiceInfoLine.LineAmount = 6.6;
 
 
        vendInvoiceInfoLine.insert();
        ttscommit;

        vendInvoiceInfoTable vendInvoiceInfoTableLoc;

        select vendInvoiceInfoTableLoc where vendInvoiceInfoTableLoc.Num == vendInvoiceInfoTable.Num;

        purchFormLetter = PurchFormLetter_Invoice::newFromSavedInvoice(vendInvoiceInfoTableLoc);
        purchFormLetter.update(vendInvoiceInfoTableLoc.purchTable(), vendInvoiceInfoTableLoc.Num);
    }

}

Monday, 18 May 2020

Connect Odata Entities in Azure Logic App in D365FO

Hi Every one,

I have prepared a small example of how to connect the Odata Entities to LogicApps.


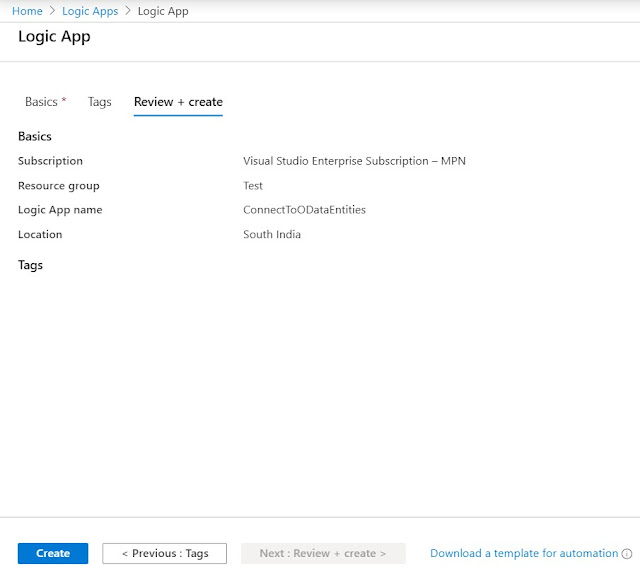
  • Complete the details in new Logic App, provide the Resource group name which you have created and provide the LogicApp name and select the location.


  • Click on Review + create button

  • Now click on create button and it will deploy the App
  • Now click in Go to resource button which will open the Logic App Designer page where will create a new blank App from scratch.

  • Let's create the App
  • This is how the App will look after completion:

  • As you can see, I have added a Recurrence to run our app with certain interval of time and also I have added few variables where I have declared some of the values, so that I can reuse the values and don't have to copy paste every time.
  • In the above image
    • varD365baseURL: Provide your D365FO environment url.
    • varClientId: Provide the Client Id that was generated while registering your VM in Azure Portal.
    • varTenantId: Provide the Tenant Id that was generated while registering your VM in Azure Portal.
    • varSecretKey: Provide the Secret Id that was generated while registering your VM in Azure Portal. 
  • Now after the variable declarations, add the HTTP action
  • In the above image:
    • URL format: https://login.microsoftonline.com/"TenantId"/oauth2/token
    • Body format:clientid="Client Id"&grant_type=client_credentials&client_secret="SecretKey"&resource="D365FO VM URL"
    • Note: Don't give any space in the body parameters
  • Once this is completed we have to parse the JSON which will be generated by this step.
  • To do it, I have used PostMan App and fed up the above details as it is to generate the JSON format.

  • As you can see in the above image I have declared some global variables in PostMan for re-usability.
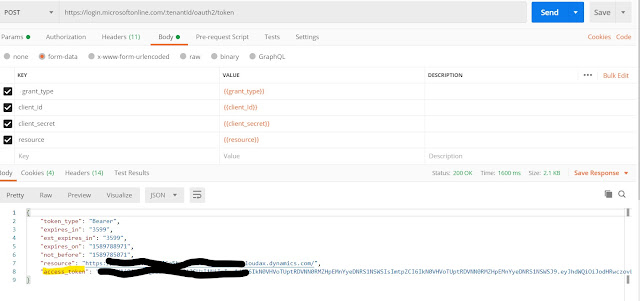
  • After creating the global variables for "Tenant Id, Client Id, Grant_Type, and resource" which are the values we provide in the "HTTP Action" in Logic App, select the Post function in PostMan as shown below and goto Params tab and give the Tenant Id as shown below:

  • Now goto Body tab and provide the rest values as shown below:
NOTE: These values are declared as global variables in PostMan app as shown above.

  • Now click on Send button to generate the Bearer Token, which is required for next step:
  • Copy the access token value and save it also as global variable with name "Bearer_token".

  • Now copy the response from the Post action of  the Postman and goto Logic App and add a new step with action Parse JSON:
  • Copy the response from Postman as shown below.
  • Goto Logic app and add ParseJson Action, click on "Use sample payload to generate schema" and paste the copied Response from Postman.

  • Once the schema is added, add a new HTTP Action and add the OData entity URL for CustomerV3 entity to read the customer:
  • Here in the above picture, I have applied filter to read a particular customer only.
  • Odata entity URL: "Youy D365FO environment URL"/data/CustomersV3 (Odata entity public name)/?$filter=CustomerAccount eq'US-019'
  • In plain english, without encoding: https://D365 URL/data/CustomersV3?$filter=CustomerAccount eq 'US-019'
  • Now we have to again parse the JSON for HTTP2 Action in postman, so create a new GET request in postman and enter the ODATA Entity URL for Customer Entity, now goto Headers tab and add a new key with name Authorization and in value, provide the Bearer Token value for which we  have created the Global variable in previous step, now click on send button and copy the response and goto Logic App.

  • Now add the new action "Parse JSON" again for HTTP2 action, and paste the Response which we have generated in previous step in Postman

  • After this add another Action for sending the email, where provide your email Id:
  • Logic App is completed, run it to see the results.
That's all for now...

Monday, 30 March 2020

Cancel Sales lines delivery Remainder in D365 F&O


 public static boolean cancelSalesLineDeliveryRemainder(SalesId _salesId, SalesExternalItemId _revnId)
    {
        SalesLine   salesLine;
        boolean     ret;
       
        ttsBegin;
         // You can use your query to find sales line.
        select salesLine
            // index salesLineIdx
            where salesLine.SalesId         == _salesId
                && salesLine.ExternalItemId == _revnId 
                && salesLine.SalesQty       == 1
                && salesLine.SalesStatus    == SalesStatus::Delivered;

        if (salesLine)
        {
            //Note don't use SalesUpdateRemain::updateDeliveryRemainder(salesLine, 0, 0) as this method is deprecated in D365 FSCM
            ret = SalesUpdateRemain::construct().updateDeliverRemainder(salesLine, 0, 0, 0);
        }
        ttsCommit;
       
        return ret;
    }

Cancel DeliveryNote (or Packing Slip) in D365 F&O


public void cancelDeliveryNote(SalesId _salesId)
    {
        CustPackingSlipJour  custPackingSlipJour;
        boolean                       isCancelEnabled;
        boolean                       isCorrectionEnabled;
       
        select firstonly custPackingSlipJour
            order by PackingSlipId desc
                // PackingSlipIdx
                where custPackingSlipJour.SalesId == _salesId;

        [isCancelEnabled, isCorrectionEnabled] = CustPackingSlipJourFormHelper::areCancelCorrectButtonsEnabled(custPackingSlipJour);

        if (isCancelEnabled == true)
        {
            Args args = new Args();
            args.record(custPackingSlipJour);
            new MenuFunction(menuitemActionStr(SalesFormLetter_PackingSlipCancel), MenuItemType::Action).run(args);
        }
    }

Tuesday, 24 March 2020

Create display value for default dimension. in D365 FO

public static void main(Args _args)
    {
        str                        dimMainAcc, dimCostCenter, dimDivision, dimLocation;
        CustTable            custTable = CustTable::find("SL0008"); // Add the CustAccount value.

        DimensionAttributeValueSetStorage   davss = DimensionAttributeValueSetStorage::find(custTable.DefaultDimension);
        int                                 i;

        for (i= 1; i <= davss.elements(); i++)
        {
             //You can add/update dimension values as per the dimension structure in the system.
            if (DimensionAttribute::find(davss.getAttributeByIndex(i)).Name == "MainAccount")
            {
                dimMainAcc = davss.getDisplayValueByIndex(i);
            }
            if (DimensionAttribute::find(davss.getAttributeByIndex(i)).Name == "CostCenter")
            {
                dimCostCenter = davss.getDisplayValueByIndex(i);
            }
            if (DimensionAttribute::find(davss.getAttributeByIndex(i)).Name == "Division")
            {
                dimDivision = davss.getDisplayValueByIndex(i);
            }
            if (DimensionAttribute::find(davss.getAttributeByIndex(i)).Name == "Location")
            {
                dimLocation = davss.getDisplayValueByIndex(i);
            }
        }

        str dimStorageValue = "-" + dimMainAcc + "-" + dimCostCenter + "-" + dimDivision + "-" + dimLocation;

        Info(dimStorageValue);
    }

Insert/Update or remove the default dimension value in D365 FSCM via x++

Use below method to insert/update the dimension values, just pass the parameter values to the method and it will return the updated value: p...